Focusing On Your Focus: Pro Tips For New Photographers
Of all those features and fancy things cameras can do, to convey subtle emotions, focus might be the most powerful camera feature of all. When you get good at focus during frantic sporting events the appeal of your shots will jump. Focus makes your subject pop out. “Tack sharp” we call it at its best.
Cameras have auto focus. Usually that means based on the center of the frame for our subject. Fast easy autopilot. However, like some features we talked about last time, let us explore a bit further. After composition, focus is what usually most shows our subject. Taking control of that focus puts you in control of where the viewer’s eye travels when the photo is viewed. However, what if your composition, your “eye” is telling you to put that subject off to one side? Or low in the shot? You will need to focus manually or set your camera to auto focus on that subject despite the fact it is not in the middle.
If you have a camera with an attached lens you can probably focus manually. Modern DSLR cameras offer “focus points” you can select. Entry level-A few. Pro camera bodies-a lot of them and clever ways to use groups of them or even designate areas that become sensitive to movement for wildlife or sports shots. Great features to have but practicing manual focus makes you a much better photographer. Turn that focus ring and watch the focus come closer or go farther away. Now we have a good start to focusing skills. But we have not yet gotten to the more challenging dimension. That’s next. Distance with depth of focus. AKA Depth Of Field. Don’t run away, we keep it simple.
Part II-DoF
This is one of the most confounding aspects of getting great images. The distance and depth of your focus. If you read about this Depth of Field thing online the jargon and math gets really intimidating. Let’s just blow that off. Math? Bah. That’s for apps to do. Even simplified though I need a little patience with a longer post. Up for the ride? Thanks. You’ll be glad you did I promise.
Already your now well practiced manual or camera auto focus accounts for absolute distance to subject. Really near and we call it macro. The bug on a flower that fills the frame.
Then ordinary distance like within a room or auditorium. Imagine taking a shot of a friend in a living room. Will those paintings on the wall take away the viewers eye from your friend? Call that middle distance.
Then we have distant objects that let us almost not bother to focus. That mountain range may span a distance from you from a say five to ten miles. You need not refocus for that 5 mile difference it’s beyond the point in distance at which your camera needs any focus adjusting at all. Infinity we call it. Laughably “infinity” usually is only a few yards away maybe a few tens of yards with a telephoto. Easy peasy in daytime.
What happens when you want that great sharp shot of a person in a room, and you want to blur everything behind them? That will keep the viewers eye drawn to your chosen subject. Depth of Field. Plane of focus. Blah blah. It’s the depth of your focus in distance. The area in focus has a near limit and a far limit. The span near to far is the depth.
There are endless technical articles on this. Pffft. Great for insomniacs. Bottom line-the depth of that focus can be really shallow, under 1mm. Change your aperture settings and suddenly you some control of depth. Change your distance from the subject and you might get feet of depth.
We simplify all this. General rules today. Remember aperture from last time? It is the key setting for depth. Ever notice how cell phones do such a great job with depth in middle distance shots or surprisingly close up? They are using a tiny hole for aperture. Pinhole cameras are great at this! Key facts-Tiny hole makes for deep depth of focus. Big hole shallows up that distance. F 32 is a tiny hole. F 2.8 is kinda big.
Distance to subject matters a lot. Get close and it’s easy to put the background out of focus. Your friend in the room now looks crisp and all those paintings on the wall do not distract the eye. Step back some and you can have it all in focus, another composition option. Maybe you want the person and the paintings in focus, perhaps your friend did the paintings! Or just make the hole smaller, and adjust to get more light. Shutter speed or ISO. Smaller hole/bigger F number means more depth.
The depth of field options vary with your lens focal length. Long focal length makes it easier to put the background out of focus. There is a phrase for this blurred background when it is adding to the quality of the shot. The word is bokeh. Great bokeh means a more satisfying or enhancing blur behind the subject.
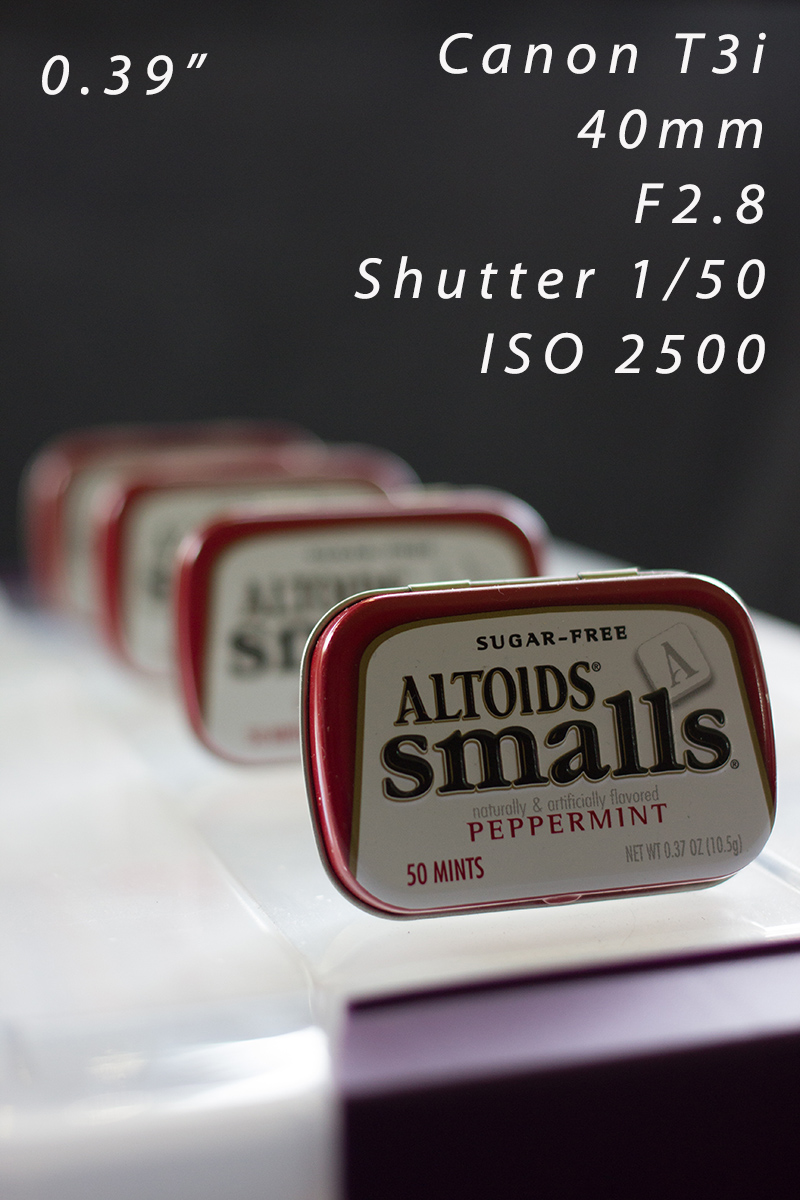
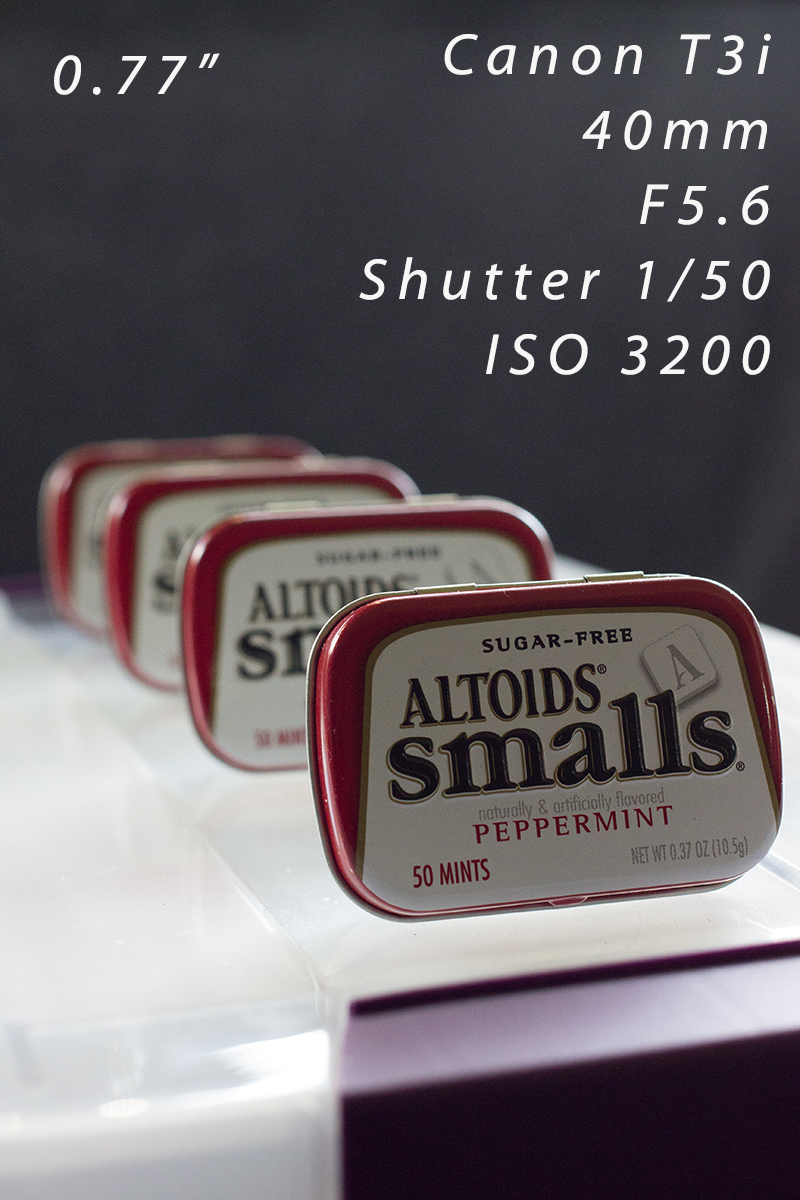
In fact, we (Curious Lurker and I) have conspired to bring you two very distinct examples, all freshly shot just for your edification. Curious Lurker was kind enough to collaborate and add some images shot much closer with a wider or aka lower focal length lens.
CL set up altoids boxes on a table, a classic setup to show this feature. She mentioned she was wrestling with exposure since the aperture changes the incoming light so much. This is where practice pays off. Also using other advanced features like shutter priority can help. The camera adjusts shutter to deal with aperture for you. Nice huh?

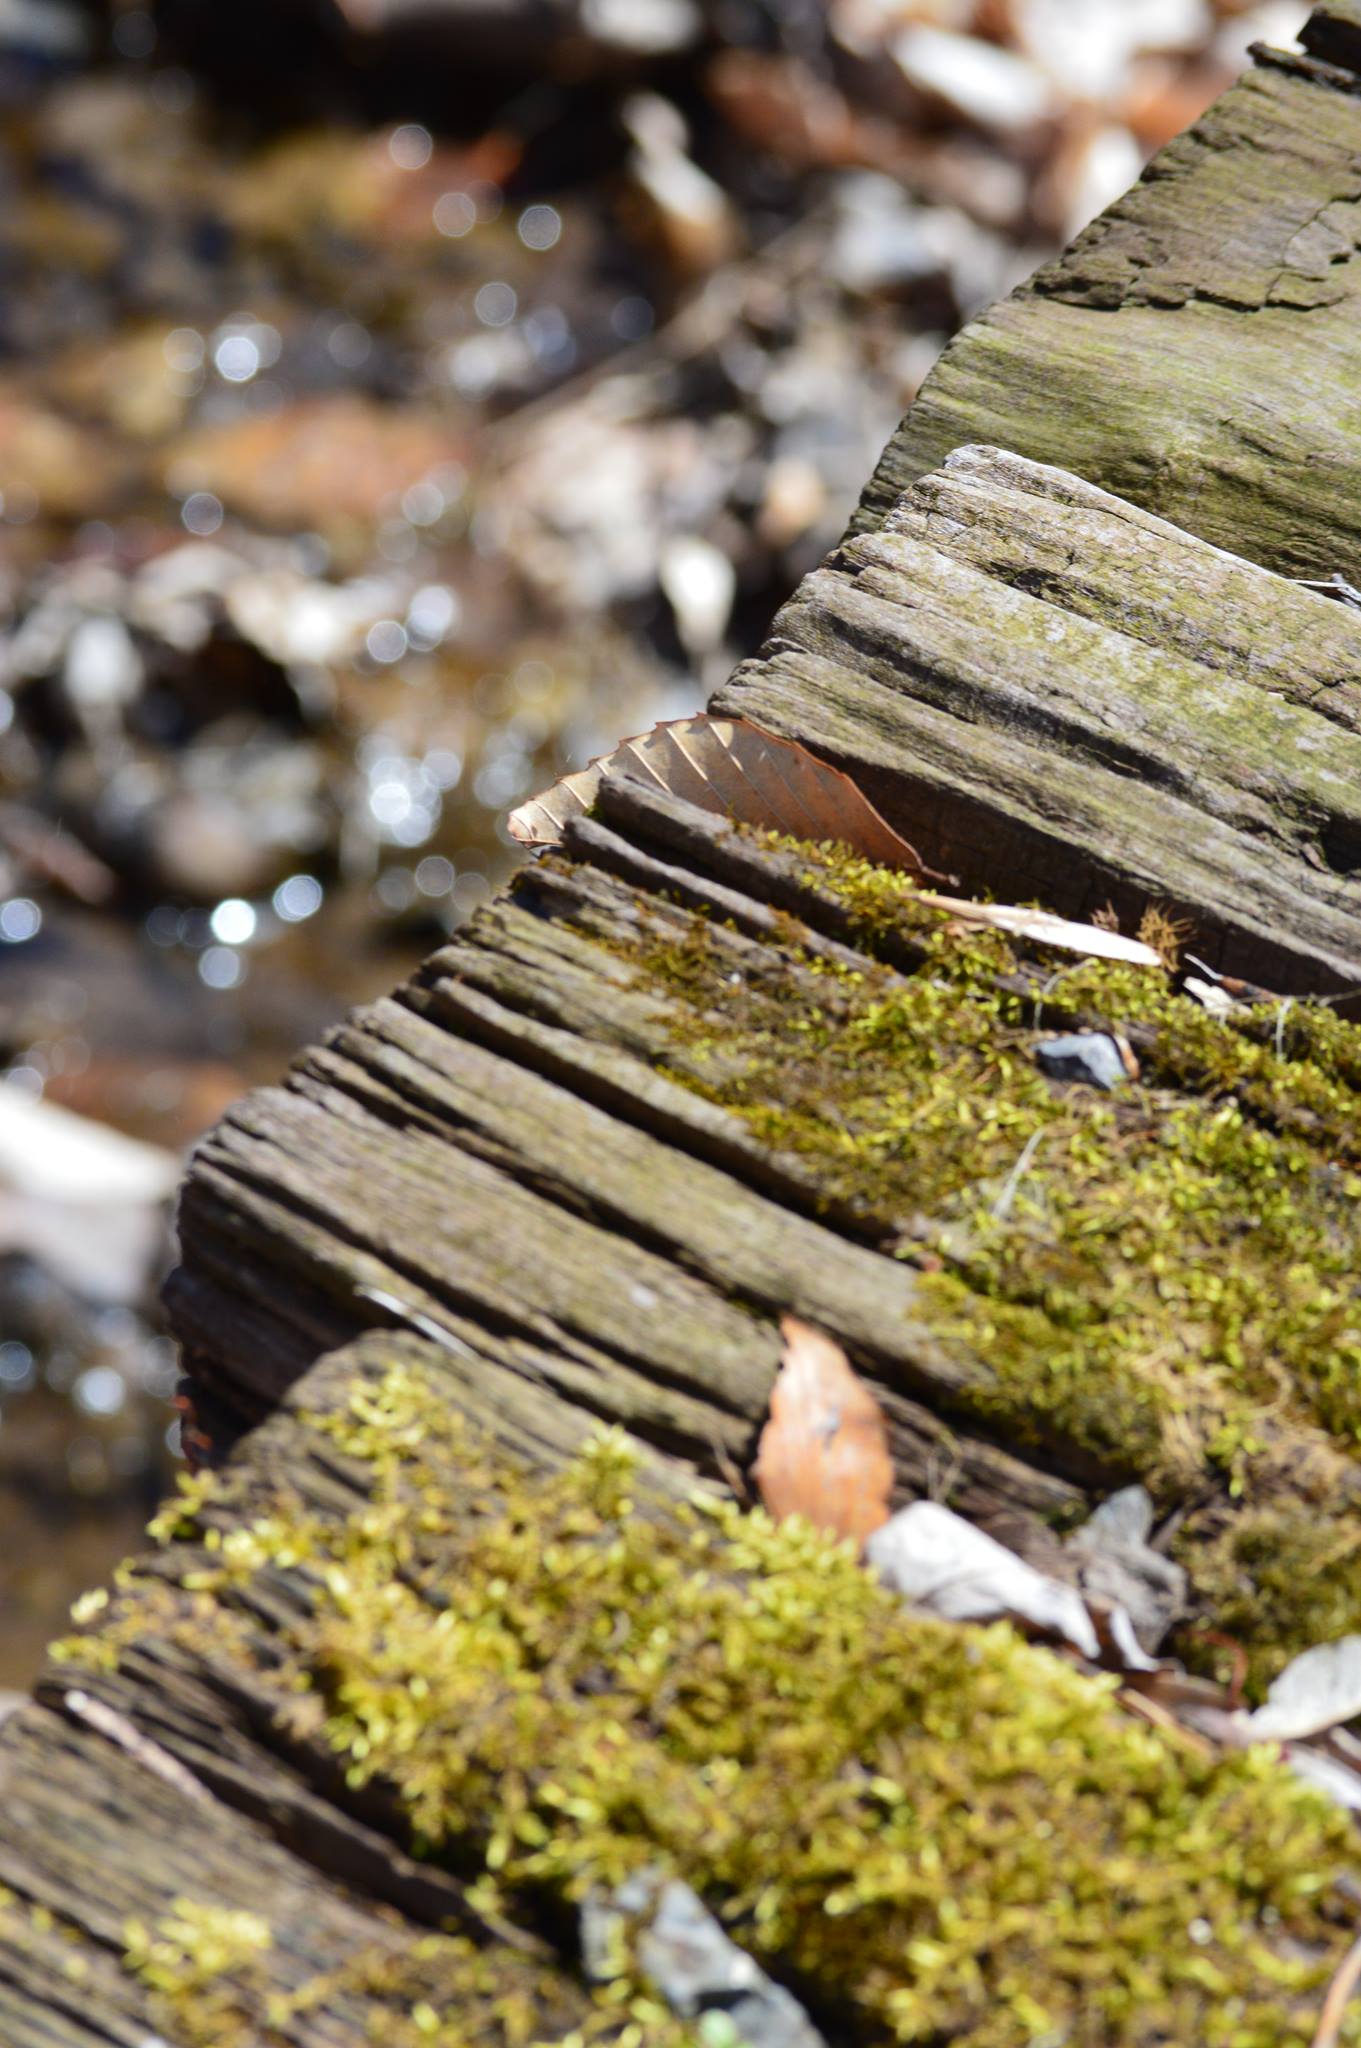
While I was up in the local mountains Saturday I came across a long dead log that may have been 30 feet long. I had my 400mm telephoto lens on. On my crop sensor camera, that is 640mm focal length. The minimum distance that lens will focus at all is about 13 feet away. I propped the camera on a stub of wood, set a high ISO to anticipate stopping down, and did my best to compose consistently. I focused on this particular stub of an old cut branch at 15 feet. I labeled the images with the essential metadata and the actual depth of field or depth of focus each shot actually has.

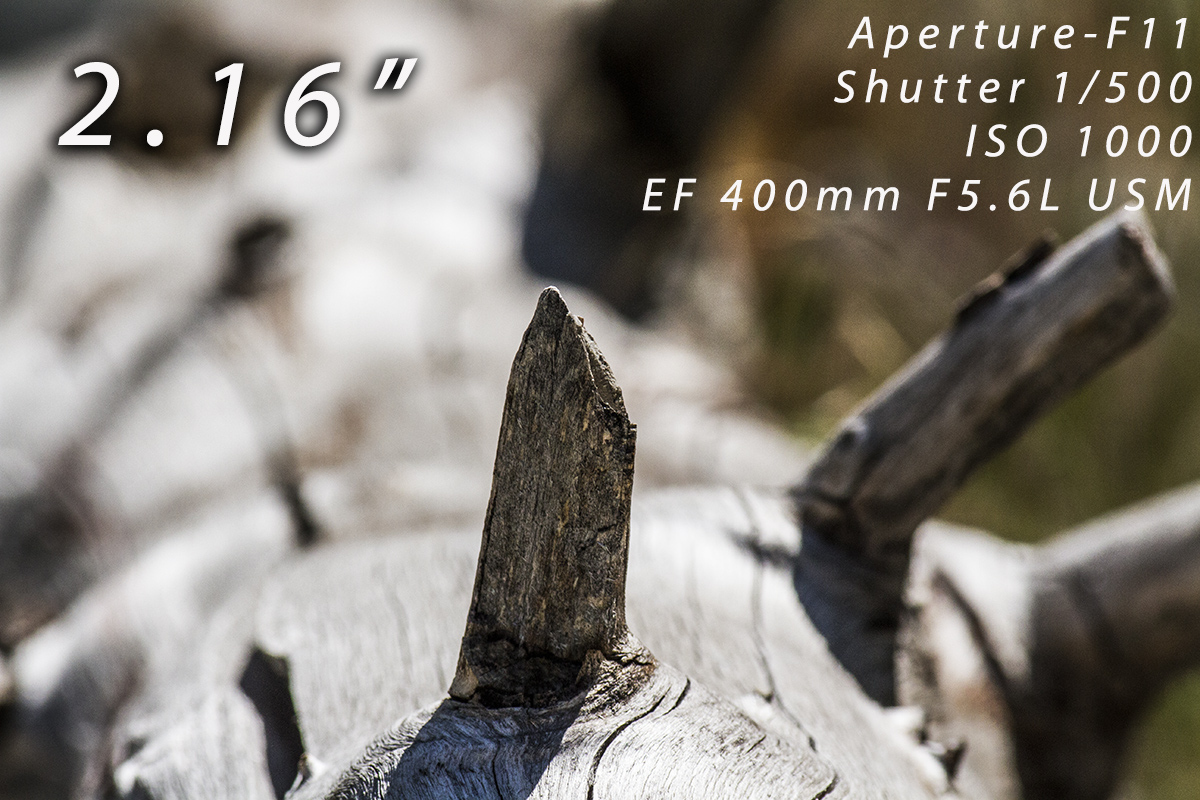

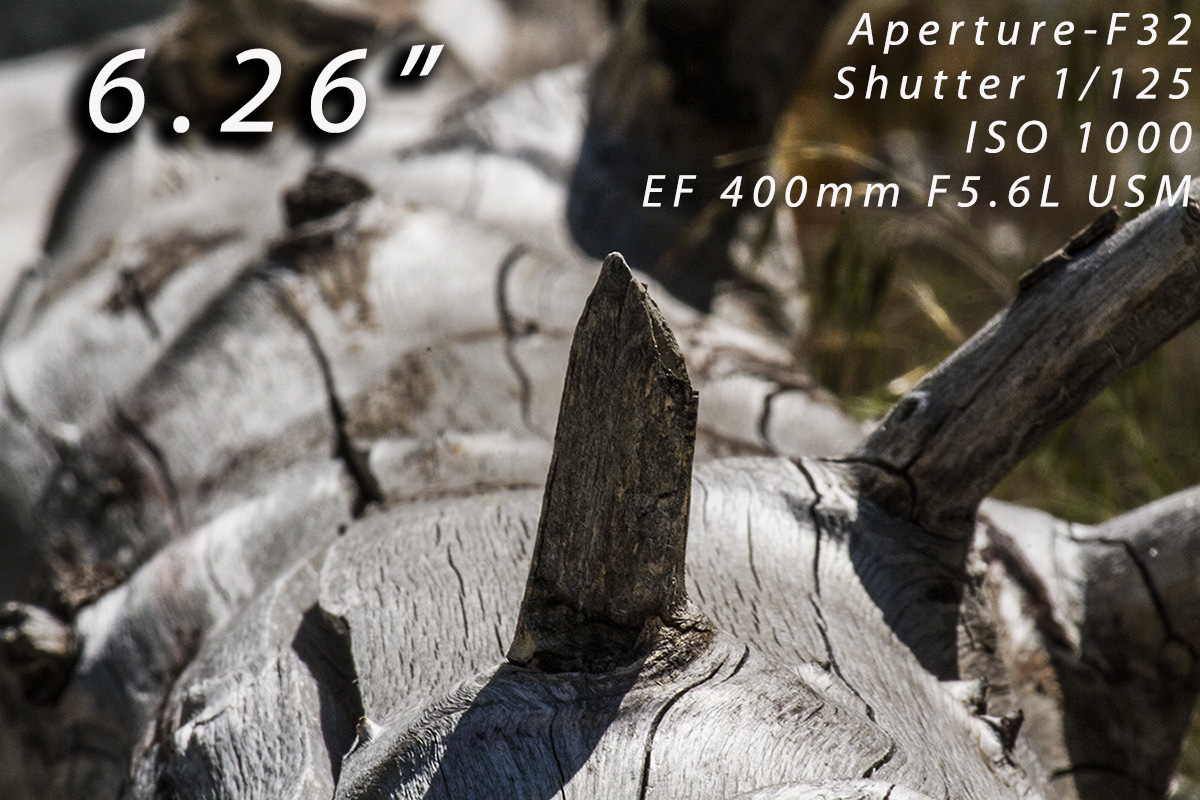
D_L wanted to show the setup where I shot this “in the wild” so to speak. Contrasts with CL’s approach.

How to practice this yourselves- Find a fence. Or a chessboard. Get close on one end. Set your aperture as small as you can. Be prepared to up the ISO or add flash, small hole /big number aperture setting makes for inadequate exposure. Or go with shutter priority mode. If you have a tripod, you can set for a long exposure instead but I am trying to keep the equipment simple. Compose & focus to show the middle of the table or fence or chessboard in the middle of the frame. Take a shot. Open the aperture one stop, take another. Do this through the whole range. Do the same with another lens if you have it.
Look at your images, CL’s and mine with the metadata. Get a DoF app. Put in your practice shot numbers. Play with the numbers. You will get an intuitive sense for this with a little time. No math, no charts, no jargon. You will see the trends of what is possible with your zoom or prime lenses.
Now go out there and compose in all three dimensions. You now have aesthetic command of the visual space around you in all three dimensions, despite using a two dimensional art form. Powerful stuff.
My thanks to CL for the collaboration. Really helped me pull this together.
embiggen images: Ballard Light Capture: Depth of Field


